Friday, 22 October 2010
neck capture
Creating the skull was pretty interesting because i needed to start with a sphere and cut it to a suitible flow and the connect it to the face.
Symmetry
Modelling my face..........
I have started to model the head by now. Started by pulling out all the lines because it was a flat surface and and i needed to give it depth. i needed to align it to the left view. I managed to pullit out and align it to make a good shape but there was a slight problem with my forhead looking a bit lumpy.
Creating Polygons
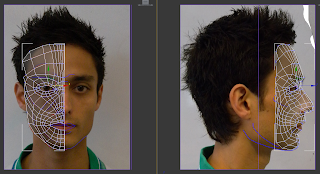
Right, from here this was quite standard. I had to first import all my images that i did in photoshop, create a plane and assign the image to the plane so that i have a reference point to work from. I turned up the self illumionation up to 100% so that from every angle that i viewed it from was visible to me. My next step was to create polygons where i had created the lines from my topology. This had to be pretty spot on and needed to make sure that everything ended up lining up properly. There were a few tweaks that help to snap the polygons together which i found useful. When i had created all the polygons, i wnet back and checked to see if all the lines had connected up properly but unfortunatly there were lines and not connected up and also there were many triangles. This meant that i had to go back to the begining and do the topology again. This step i found a lot less menacing than the topology. pretty straight forward and not to frustrating.
Topology...
Fot the topopoly i was having real problems with the flow of my face. I had to start with the eye and work round to the eye lid. The main problem that i had was the mouth and nose area. I kept on getting triangular shapes in the corner and this kept messing up my progression. I had to redo the topology many many times, and on a later stage had to go back and start a fresh. After quite a few attempts i got the hang of it but this will take a little bit of persistance and practise.
Subscribe to:
Posts (Atom)